
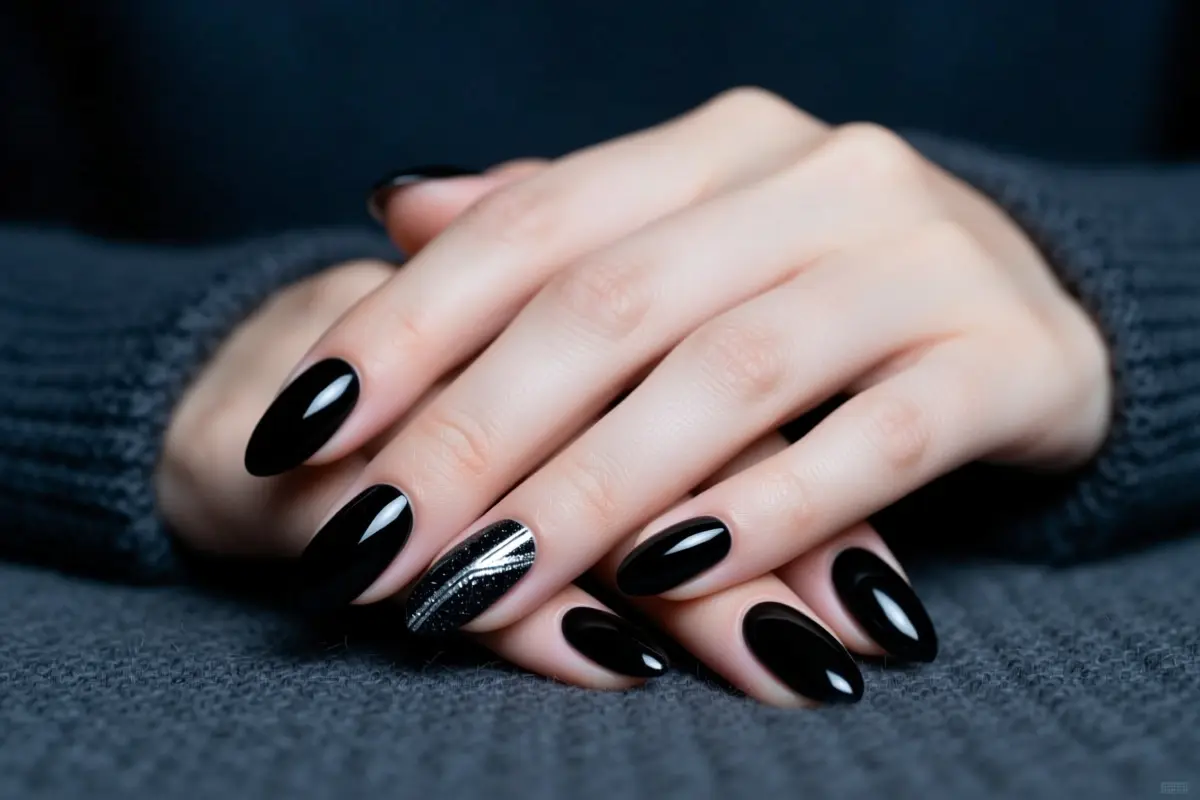
Black Winter Nails: The Cool-Girl Guide to Cold-Weather Glam
While holiday parties glitter with pastel sparkle and candy‑cane reds, the real winter statement lives in a sleek black manicure. Dark polish packs heavy pigment, so it needs a longer UV/LED cure to stay smooth and avoid peeling.
This listicle serves up ten black‑nail styles, from high‑shine patent‑leather to velvety matte, plus the exact base‑coat, curing, and top‑coat tricks that keep the shade from dulling or staining. If you crave an understated, high‑fashion edge that survives cold‑weather wear, keep reading. We’ll also flag the common pitfalls, like matte finishes that soak up oils or glossy tops that scratch quickly, so you can choose the finish that matches your lifestyle.
1. The High-Gloss Patent Leather Finish
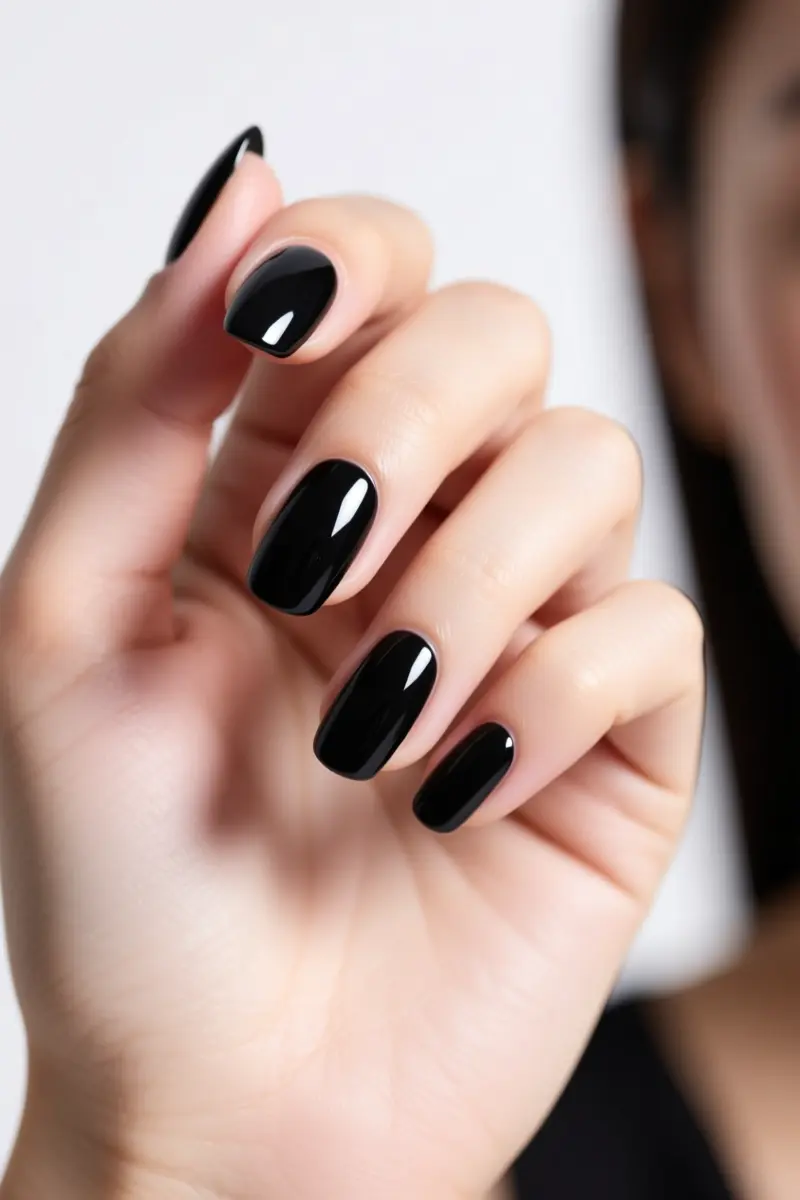
The high-gloss patent leather finish delivers a liquid‑like, ultra‑reflective black look that mimics luxury patent leather. It relies solely on texture, not on any pattern, to create a sleek, mirror‑like surface.
For gel nails, apply the black polish in two micro‑thin layers instead of one thick coat; this prevents curing failure and keeps the shine even.
Cap the manicure with a non‑wipe top coat, which locks in the glass‑like shine without the hazy residue of regular top coats.
A common mistake is using a standard top coat that scratches easily, leaving dull spots on the glossy surface.
Pro tip: seal the free edge before the final cure to stop premature tip wear and extend the mirror effect.
Because the glossy finish shows fingerprints, dust, and smudges, expect frequent touch‑ups; a soft cloth and mild soap clean the surface without damaging it.
Avoid acetone or generic nail polish remover, as they can erode the high‑gloss layer and cause cracking, especially in cold weather when conditioning is skipped.
2. Matte Velvet Dual-Texture Contrast
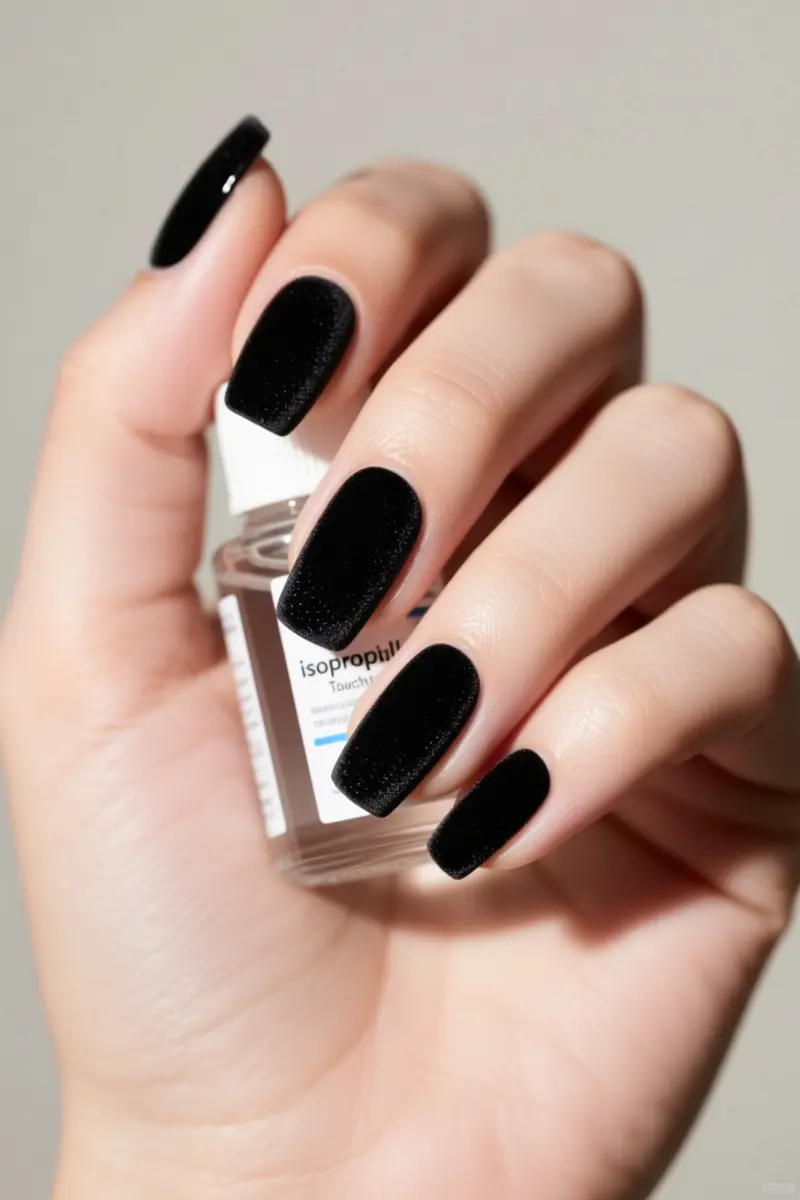
A matte velvet dual‑texture contrast pairs a chalky matte black base with magnetic velvet accents for striking winter nails.
The velvet black finish delivers a soft, slightly powdery texture that feels different from glossy or true matte surfaces, and it ranks among the four most‑saved black nail finishes in 2026.
In cold weather, the flat matte top coat tends to attract hand creams and oils, which can dull the intended velvety look.
A quick swipe with an isopropyl alcohol wipe restores the matte sheen without stripping the polish.
Many Instagram users praise black velvet nails as simple, bold, and effortlessly chic, noting zero regrets after application. The finish is easy for DIY enthusiasts and can survive 14 + days on the nail.
A common mistake is skipping the black base coat before applying magnetic velvet polish; without it, the magnetic particles lose depth, and the contrast appears flat. Start with a thin black base, cure it, then layer the magnetic velvet for the intended light‑catching effect.
Pro tip: after the final top coat, keep a small bottle of isopropyl alcohol on hand for touch‑ups throughout the season. This keeps the matte velvet look crisp despite frequent glove use and winter moisturizers.
3. The Obsidian Micro-French Tip
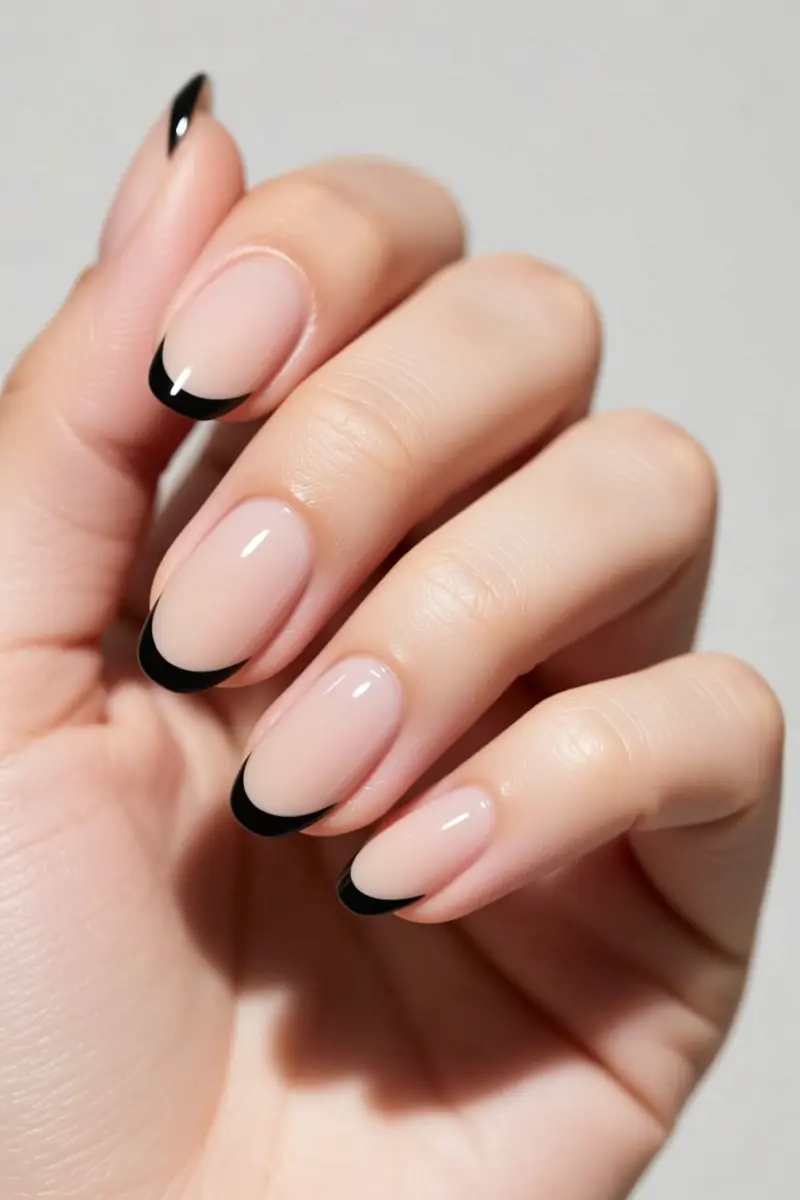
The Obsidian Micro‑French tip adds a whisper‑thin black line to the very tips of a sheer, skin‑toned base.
Start with a sheer base coat that matches your skin undertone: choose a cool pink‑leaning nude for pink undertones, or a warm beige‑tinged sheer for golden tones. Apply the base in one smooth swipe and let it cure fully.
Using a fine‑point brush, draw a single black line no wider than a pencil lead along the free edge, stopping just before the cuticle.
The line should sit flush with the nail surface; a thick layer creates a raised bump that spoils the sleek look.
Because the black accent sits only at the tip, any nail regrowth appears as a natural skin‑colored extension, making this design ideal for fast growers.
It works best on medium to long nails where the tip is visible; very short nails may lose the effect.
A community of nail lovers notes that black micro‑French tips on stiletto shapes feel elegant and bold on every skin tone, but the same sleekness can feel harsh on overly short, rounded nails. Keep the tip sharp with a top coat every two weeks to avoid chipping.
4. Deep Charcoal Cat-Eye Polish
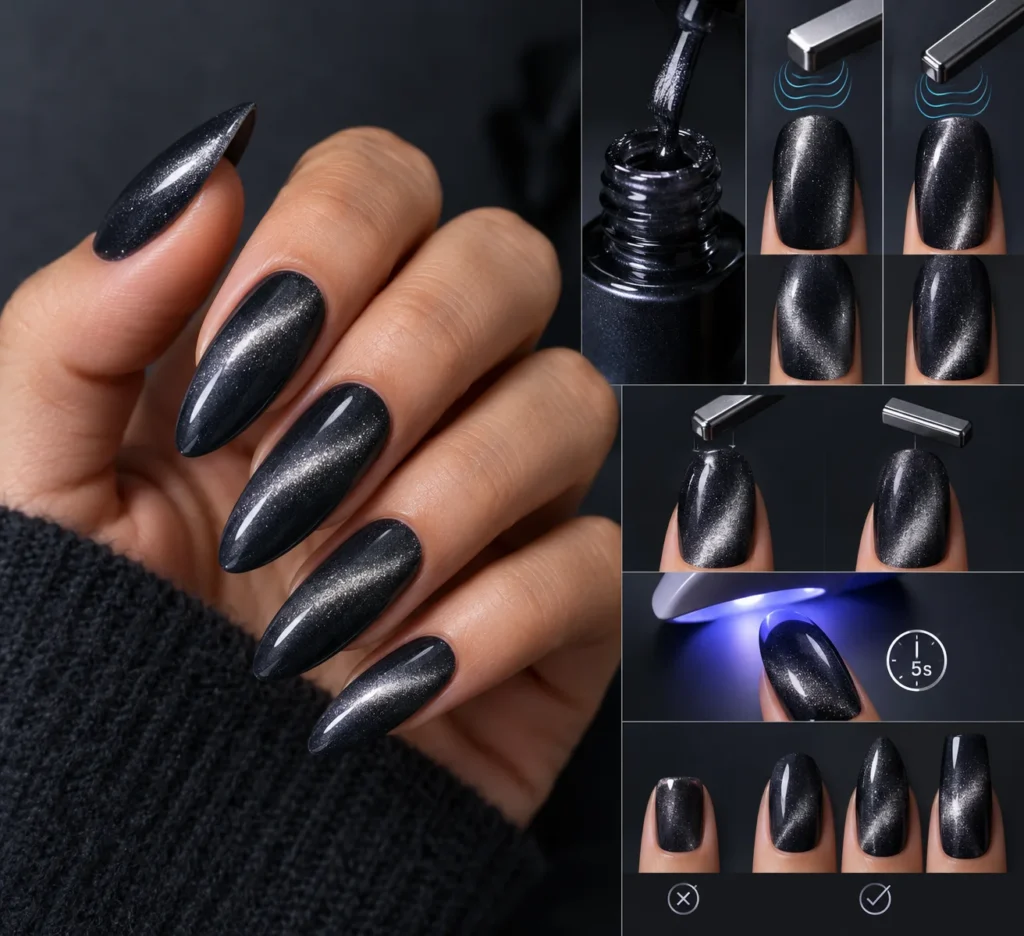
Deep charcoal cat‑eye polish delivers a velvet‑like, multidimensional shine that acts like a spotlight on each nail.
The effect comes from metallic particles in a magnetic cat‑eye gel that align when a magnetic wand passes over the wet surface.
A 3D magnet creates broader, softer swirls, while a 5D wand produces tighter, sharper lines; moving the wand closer to the nail plate tightens the pattern, while pulling it farther away softens the flow.
A pro tip: hold the wand still for a full five seconds before flash‑curing to lock the design in place. This pause lets the particles settle into a deep, glossy finish that feels neither overdone nor underwhelming.
A deep charcoal base offers a softer backdrop than pure black while still letting the cat‑eye pop, and the final look works on every nail shape, though medium‑length almond or coffin nails showcase the dimensionality best.
Users describe the shimmer as clean, glossy, with sparkly drama, adding instant main‑character energy.
The main limitation is visibility on very short nails; the limited surface area reduces the hypnotic slide of light across the metallic particles, making the effect appear muted.
5. Negative-Space Celestial Stars
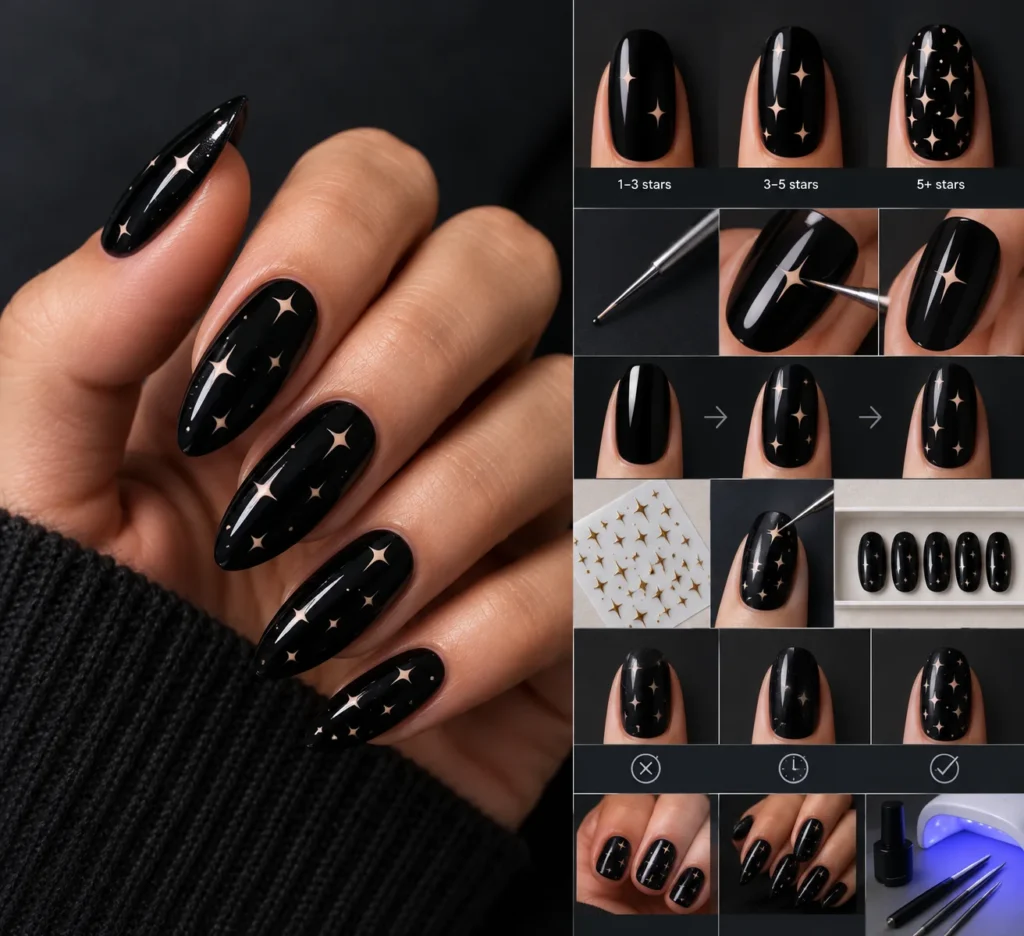
Negative‑space celestial stars give a sleek, understated sparkle on a glossy black base. The design uses the bare nail as the star’s outline, so the dark polish stays visible between points.
One to three tiny stars work as a subtle accent, while five or more cover the entire nail for a bolder look.
Short nails handle the effect well; smaller stars and tighter clusters stay crisp on limited surface area.
A fine‑tipped dotting tool or a fine‑tipped brush pulls out each point cleanly, preventing feathered edges.
Apply the stars after a fully cured base coat, then seal with a top coat that isn’t overly sticky; many people find a tacky base makes the dots slide before they dry.
For those who lack steady hands, high‑quality nail decals or press‑on sets provide the same celestial vibe with far less effort.
Etsy sellers list metallic star decals for around $75, making the option budget‑friendly.
Hand‑painted stars, stickers, and gel‑applied versions differ in durability; users report that stickers tend to lift sooner, while gel holds longer but requires a lamp. Choose the method that matches your desired wear time and steadiness level.
6. Translucent Smoky Quartz Marble
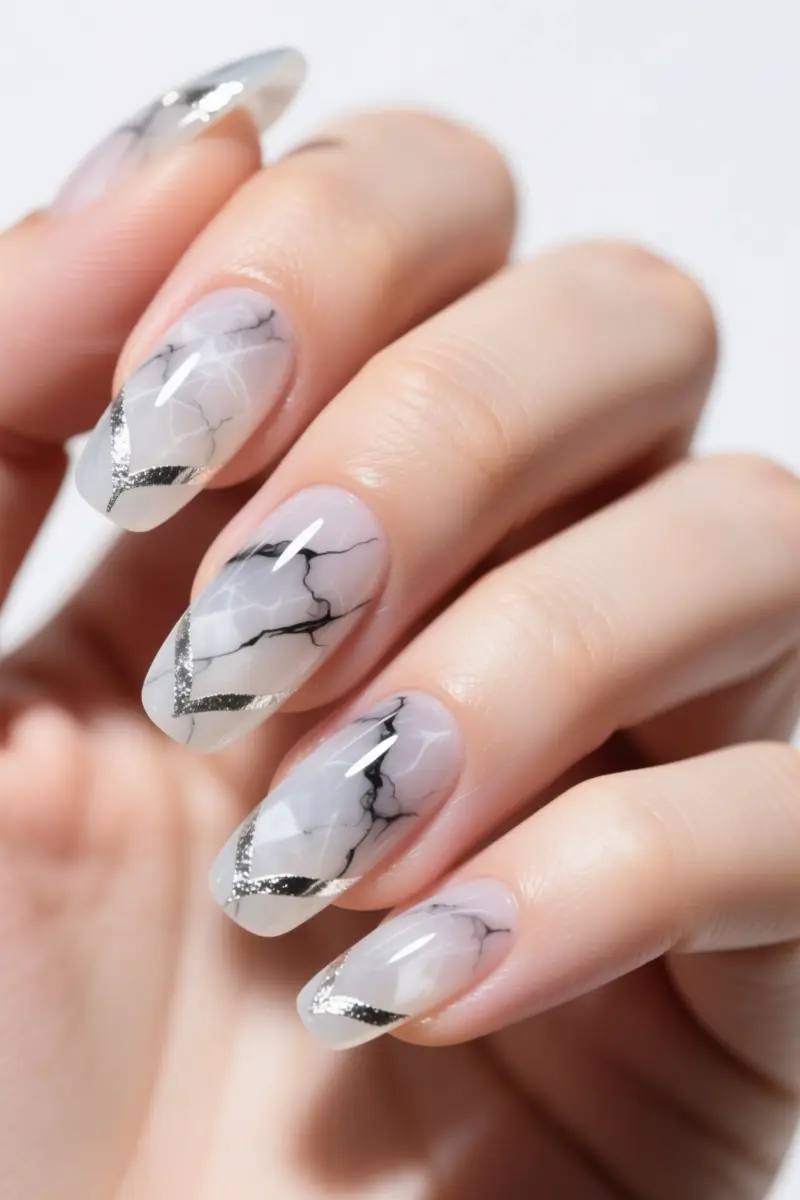
Translucent smoky quartz marble nails achieve a semi‑translucent, watercolor‑like depth with black and gray veins.
The effect starts with a milky base of clear gel, then a fine brush loads black gel polish thinned with a drop of isopropyl alcohol or acetone.
Dragging the brush creates organic, smoky nail art veins that mimic quartz patterns.
Because the pigment is diluted, the veins remain see‑through, letting the milky foundation glow. Many salons layer the veins in multiple passes; each layer adds height and creates a 3‑dimensional stone illusion.
A pro tip is to let the first veil dry, then add a second, slightly thicker line to enhance the marble nails’ depth.
Silver foil accents can be pressed over the cured design for extra sparkle, matching the researched fact that smoky quartz veins and foil work well together.
Users describe the finished look as soft, dreamy, with a hint of sparkle, and they often pair it with chrome effects for extra shine.
The technique looks highly professional, but it demands at least an hour of skilled salon time. The need for precise brushwork and multiple curing steps makes it less suited for quick DIY sessions.
7. Fine Metallic Onyx Shimmer
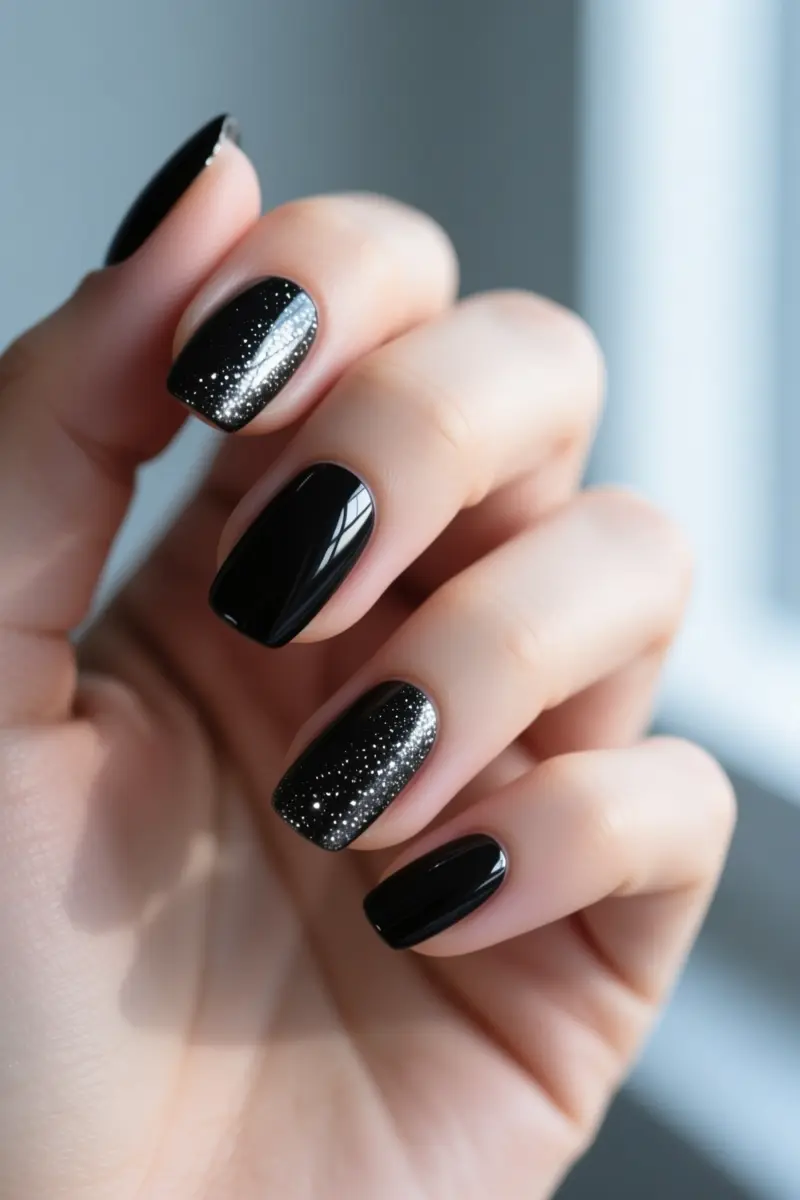
Fine Metallic Onyx Shimmer provides a subtle, sophisticated black nail look with micro‑shimmer instead of chunky glitter.
The polish blends deep onyx with fine silver dust, creating a low‑key sparkle that catches light without overwhelming a winter outfit.
This finish suits cool-toned skin and works well for both casual coffee dates and evening events because the shimmer adds depth without clashing with dark coats.
A base coat is essential; skipping it often leads to intense pigment staining that can turn the nail surface yellowish over time.
Apply a thin, clear base, then two coats of the metallic shade for even coverage. The finish stays glossy for up to a week, but the delicate shimmer can chip more quickly on weak nails, so it’s best for those with a healthy nail plate.
When removal time comes, avoid aggressive scraping. Scraping can thin the natural nail plate and cause painful ridges.
Use the foil wrap method: cut small squares of foil, soak a cotton pad in ONYX Professional 100% Acetone Nail Polish Remover, place the pad on each nail, and wrap with foil.
Let it sit for five minutes, then gently wipe away the softened polish. This soak‑off gel technique is praised for being gentler on weakened nails while still eliminating stubborn dark polish and micro‑shimmer particles.
A common mistake is filing off the top coat before soaking; this creates a larger surface area and can lead to uneven removal.
Follow the three‑step routine, file lightly, soak, then wipe, to keep nails smooth and ready for the next look.
8. Tortoiseshell & Solid Black Split
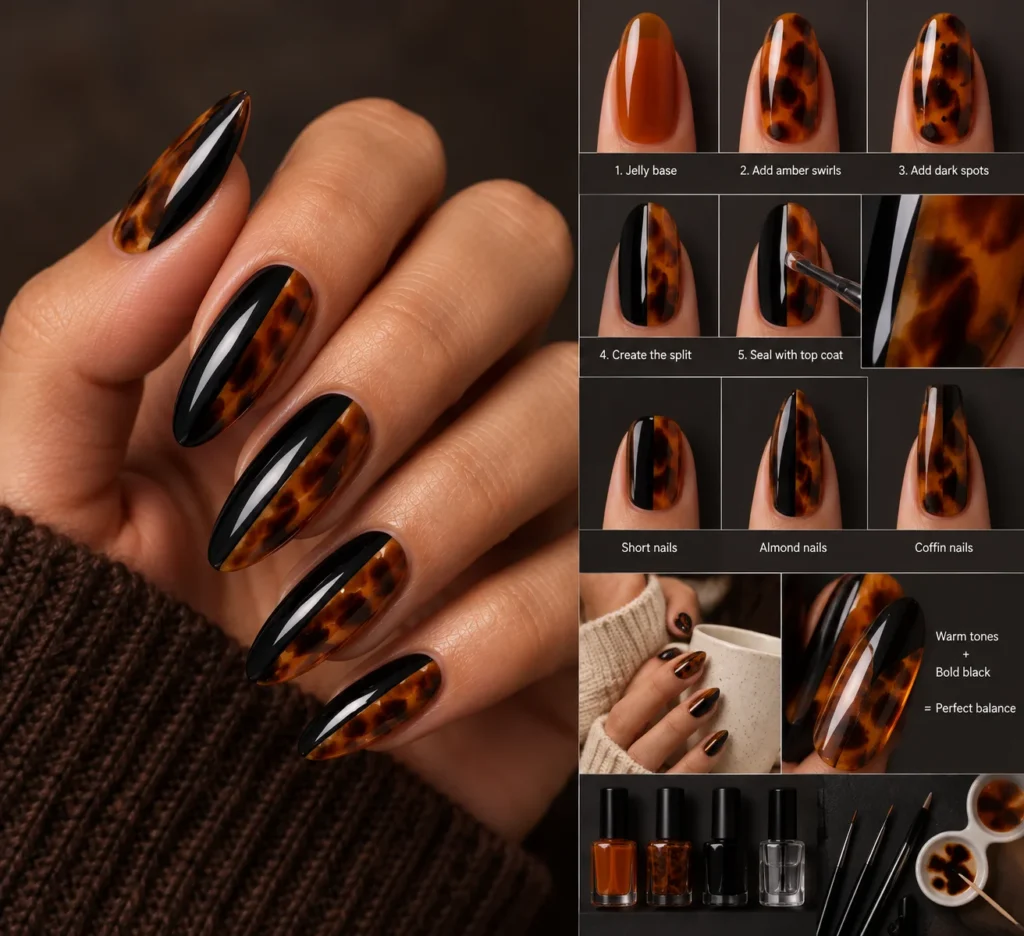
The tortoiseshell‑and‑solid black split creates a bold yet balanced look. Warm amber tortoiseshell prints soften the stark gloss of black, so the combo flatters warm undertones and caramel‑rich skin.
The effect works on short natural nails and long almond extensions alike, making it versatile for everyday wear.
A pro tip: apply a jelly orange‑brown base, then add translucent amber swirls and tiny dark spots before sealing with a glass layer.
The jelly polish adds depth, while the spots mimic natural wood grain for realistic texture. This layered approach yields a multi‑dimensional finish without looking flat.
Enthusiasts say the design evokes a cozy fall vibe, pairing effortlessly with sweaters and hot drinks.
The balance of bold black and neutral tortoiseshell makes the manicure eye‑catching yet easy to match with winter outfits.
The main downside is the technique’s complexity; many find the layered translucent colors time‑consuming to apply.
If you prefer a quick DIY, a single‑tone black or simple tortoiseshell may be a smoother choice.
9. Abstract Minimalist Brushstrokes
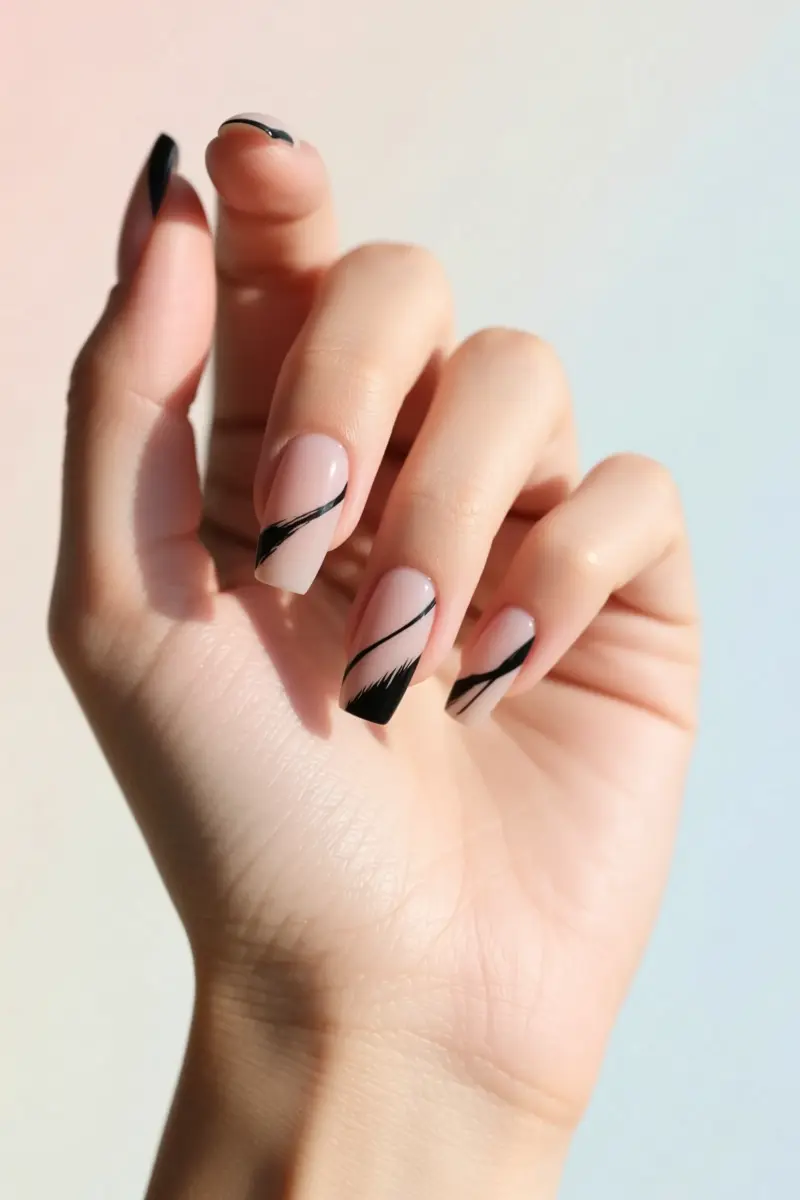
Abstract minimalist brushstrokes use dry‑brush black lines over a sheer matte base for an effortless winter vibe.
This minimalist nail art relies on the dry‑brush technique, where the brush is almost completely dry before a quick swipe across the nail. This creates organic brushstrokes that look slightly uneven, and the irregularities actually add character.
Start with a matte or satin topcoat as the background; the low‑shine surface makes the black strokes pop without glare.
Dip a thin nail brush into black polish, then blot it on a tissue until only a faint film remains. Sweep the brush lightly from tip to cuticle, letting the pigment catch only the raised ridges of the nail.
Using too much product fills the texture and defeats the raw aesthetic, so a light hand is essential.
The design is budget‑friendly and can be done with a single bottle of polish and a basic brush.
A common downside is that beginners may find the brush control tricky, and the finish can wear faster on oily skin types.
Practice on a nail tip before tackling all ten nails for consistent results.
10. The Ultra-Short Squoval Noir

The Ultra-Short Squoval Noir delivers low‑maintenance, high‑fashion nails in a single shade of rich black.
A short manicure in the squoval shape stays out of the way while you type, button a wool coat, or grip a coffee mug, and it resists painful breaks that longer styles invite.
Classic black lacquer adheres well to a trimmed edge, so you don’t need a gel upgrade to achieve a sleek look.
A daily pro tip: apply a thin top coat over the free edge each morning.
Capping the edge creates a barrier that slows chipping, keeping the glossy finish intact through winter chores. Because the nails are short, the top coat dries quickly and won’t thicken the silhouette.
Winter air, indoor heating, and frequent hand washing can leave even short nails dry and prone to peeling.
Experts recommend hydrating nails and cuticles with hand cream and cuticle oil at least twice a day, and adding a nighttime ritual of washing, moisturizing, then wearing cotton gloves.
If you prefer press‑on options, choose high‑quality press‑ons that offer the squoval shape; they stay strong, glossy, and hydrated without the harshness of acrylics.
Wearing gloves while outdoors or cleaning adds extra protection for this minimalist yet striking look.
Your Next Dark Nail Moment Awaits
Start every black manicure with a stain‑preventative base coat and give the color an extra 5‑10 seconds under the lamp; the extra cure locks in pigment and stops cracking. For a high‑gloss look, seal it with a non‑wipe top coat that resists microscopic scratches, and avoid matte finishes if you want the shine to stay vivid through gloves and coffee runs.
Pick the finish that feels like you, practice the cure timing, and let the dark hue do the talking. A little prep goes a long way toward keeping your black nails looking fresh all season. Save this guide for your next salon appointment or share it with a friend who prefers sleek over sparkle.
Frequently Asked Questions
How do you prevent black nail polish from staining your natural nails?
To prevent staining, always apply a high-quality, ridge-filling base coat designed specifically to block highly concentrated dark pigments from absorbing into the porous layers of the natural nail plate.
Why does black gel polish often wrinkle or bubble while curing under a UV lamp?
Black gel polish wrinkles when it is applied too thickly, preventing UV light from penetrating to the bottom layer of the polish and leaving the uncured gel underneath to shrink and bubble.
How do you keep matte black nails from looking dirty and gray over time?
Matte black nails should be wiped regularly with a lint-free pad saturated in 70% isopropyl alcohol to strip away built-up hand creams, oils, and makeup without damaging the matte finish.
What shape of nail looks best with solid black polish?
Short, active-length squoval or rounded nail shapes look best with solid black polish, as they provide a clean, modern aesthetic without the harsh or aggressive appearance of long, pointed shapes.